Fast Fact:
PULIH is a Wireless Low Back Pain Monitor Device is a Li-ion battery-powered device developed to provide a quantitative rehabilitation progress monitor of low-back pain patients. It consists of an electromyography (EMG) circuit integrated with Inertial Measurement Unit (IMU) to capture muscle activity at the lower back and motion data during intervention. The captured data is cleaned and sent to user ’s smartphone before sent to the cloud for enhanced processing. The processed data provides index of their low-back pain improvement throughout the rehabilitation program. The index will be of assistance to the rehabilitation doctors as a quantitative measure to assess progress the patients.
Reach us through our website www.nonivasi.com or send us an email through [email protected]
Nonivasi Care Sdn. Bhd. warrants the PULIH device as the following; only PULIH main housing (internal components), and slider arm housing are covered for a period of ONE (1) YEAR and SIX (6) MONTHS respectively, from the date of original purchase by the end-user purchaser (“Warranty Period”). Guidelines are published include but not limited to information contained in technical specifications and instruction for use.
Main housing, slider housing, type C charging cable and manual instruction.
Registration for DO is made through the PULIH Doctor Dashboard. Given that DO already register in the PULIH Doctor Dashboard, DO can log in into the app using the designated USERNAME (EMAIL) and PASSWORD. Successful login will direct DO to the HOME screen. Unsuccessful login with prompt ERROR. FORGOT PASSWORD option is available if password is forgotten. SIGN UP link provided for NORMAL USER only.
Registration for NU is made in the mobile application. Successful registration will create an account and will be guided to the GET STARTED screen. LOGIN is for NU with existing account. Successful login will direct NU to the HOME screen. Unsuccessful login with prompt ERROR. FORGOT PASSWORD option is available if password is forgotten.
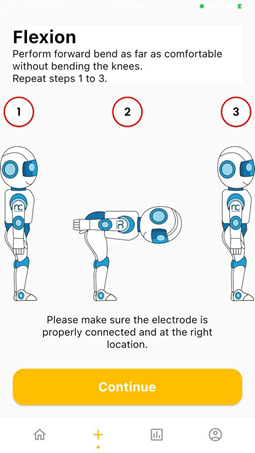
MEASURE screen is accessible from the NAVIGATION BAR in the HOME screen. It starts wth a general GUIDE for the intervention process that is required during the measurement. CONTINUE button is to proceed with the measurement. (It will only be enabled if there is a minimum (1) device registered.) START button is only enabled when Bluetooth connection is established between the device and the mobile apps. If Bluetooth is disconnected. BLUETOOTH button is ENABLED to enable user to connect to PULIH DEVICE. On START button pressed, STOP button will be ENABLED, RESTART button (DISABLED) will appear, and USER ANIMATION will move. On STOP button pressed, RESTART button will be ENABLED, STOP button will be DISABLED and USER ANIMATION will be in standing position (RESET). After 30 seconds from START/RESTART measurement, ALERT DIALOG for sufficient data collected will be shown and redirected to RESULT screen. On CONTINUE button pressed, page is directed to HOME screen.
To pair PULIH device to the mobile application, after first time registration, NU will be guided to the GET STARTED screen and then LINK PULIH screen to scan QR CODE on the PULIH device. For DO the DEVICES options allows DO to see lists of registered devices and to register new devices. To register a new device, click on REGISTER PULIH Device and then in the following screen click on LINK PULIH.
PULIH is intended to be used for monitoring rehabilitation progress of patients with chronic low-back pain under supervision of healthcare providers, physicians, rehabilitation specialists, physiotherapist, chiropractors and normal user. PULIH will be used with PULIH mobile apps (iOS & Android) for control of the measurements and personal progress tracking. Clinicians will be able to monitor the patients progress remotely using the Dr Dashboard which can be accessed through internet browser. It is suitable to be used at home or healthcare facility.
PULIH is intended to be used for monitoring rehabilitation progress of patients with chronic low-back pain under supervision of healthcare providers, physicians, rehabilitation specialists, physiotherapist, chiropractors and normal user. PULIH will be used with PULIH mobile apps (iOS & Android) for control of the measurements and personal progress tracking. Clinicians will be able to monitor the patients progress remotely using the Dr Dashboard which can be accessed through internet browser. It is suitable to be used at home or healthcare facility.
The requirement for iOS Device are:
iOS 16 Operating systems and up to date:
iPhone 8 current minimum requirements.
RAM 2GB minimum.
Storage 8GB minimum.
The requirement for android device:
Android P (Pie) @ Android 9 (API 28) Operating system or later.
BLE 4.2 Support
RAM 1GB minimum
Storage 8GB minimum
Screen resolution 1280×720 (minimum), 1920×1080 (recommended)
This warranty does not apply to (a) consumable parts, such as battery; to (b) cosmetic damage, including but not limited to scratches, dents and broken plastic on ports unless failure has occurred due to a defect in materials or workmanship; (c) to damage caused by accident, abuse, misuse, fire, earthquake or other external cause; (d) damage caused by operating the PULIH device outside Nonivasi Care’s published guidelines (refer instruction for use and technical specification); (e) to damage caused by service or upgrade performed by anyone who is not a representative of Nonivasi Care or Nonivasi Care’s authorised service provider; (f) to PULIH that has been modified to alter functionality or capability without the written permission of Nonivasi Care; (g) to defects caused by normal wear and tear or otherwise due to the normal aging of the PULIH device; (g) if any serial number has been removed or defaced from the PULIH device, or (h) from stolen and rental product.
Alternate red-green-blue : power on
Blinking blue : Searching for connection
Solid Blue : bluetooth connection is established
Fade green : ready for measurement
Blinking green : measurement in progress
Solid green-blue : measurement complete
Solid red : charging in progress
Solid orange : fully charged
Turn on PULIH for the first time. Red, green, and blue LED will illuminate alternatively, indicating Power On. Set aside for preparation to pairing.
Connect the USB cable included in the packing to the female USB port on the device. Connect the opposite end of the USB cable to a certified charging block that is plugged into an electrical outlet. Upon activating the outlet, a red LED will illuminate for the duration of the charging procedure. Once the lithium-ion battery is fully charged, an orange LED will illuminate.
Connect slider to the main body via magnetic connector with aid of the magnetic slot. The magnetic connector provides power supply from the battery to the slider for data acquisition.
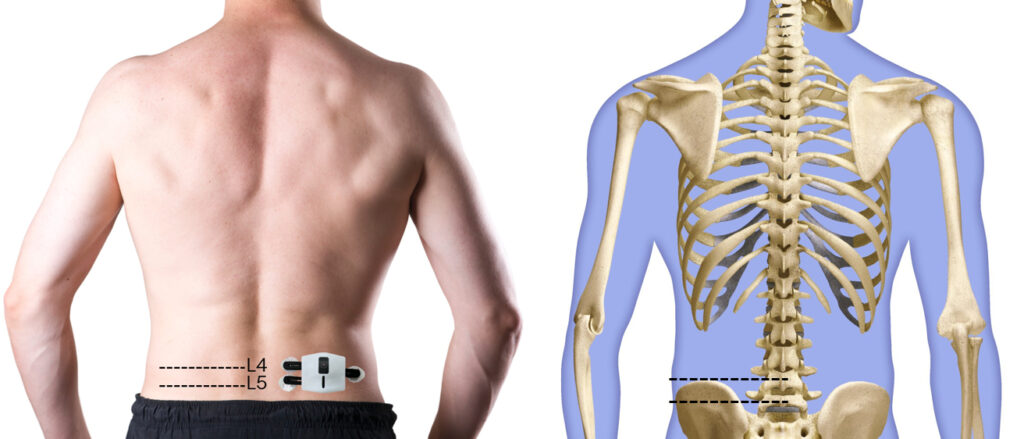
How to place the electrode?
Get your physician assistance for first time fitting for electrode placement. The placement of the electrode requires for palpation technique to properly identify the location of the Lumbar 4 and Lumbar 5. First and second electrode for potential differences are placed respectively at each level, 2 cm from the midline of the body. Placement of the electrode should be as the diagram showed:
How to conduct the measurement?
- Turn the device ON by pressing the ON/OFF button on the device. LED indication on the device should illuminate Red, green, and blue alternatively.
- Establish connections to the mobile apps (if not yet; can refer to Page 14).
- Clean the skin using alcohol swab for electrode placement.
- Remove the sticker on the patch, place the patch onto the lower back muscle location, 2cm to the right of the midline from L4 and L5.
- Attach the slider attachment to the electrode patch via the clip connector.
- Attach the main housing to the slider attachment via magnetic slot.
- Standby the mobile apps at the measurement screen. Once the user standing in the comfortable position and read the instruction on the Standy screen, click on “Continue” as shown in the image below.
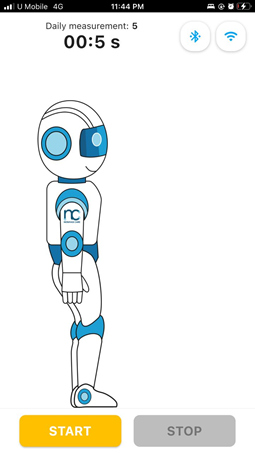
- The app screen will show a robot assistant standing upright. this robot assistant will represent the user and follow the the user’s flexion movement as the user perform flexion. Once the user is ready to perform flexion, press “start” button in the mobile apps as shown in the image below.
- Conduct the movement shown in the mobile apps for the duration of 30 seconds.
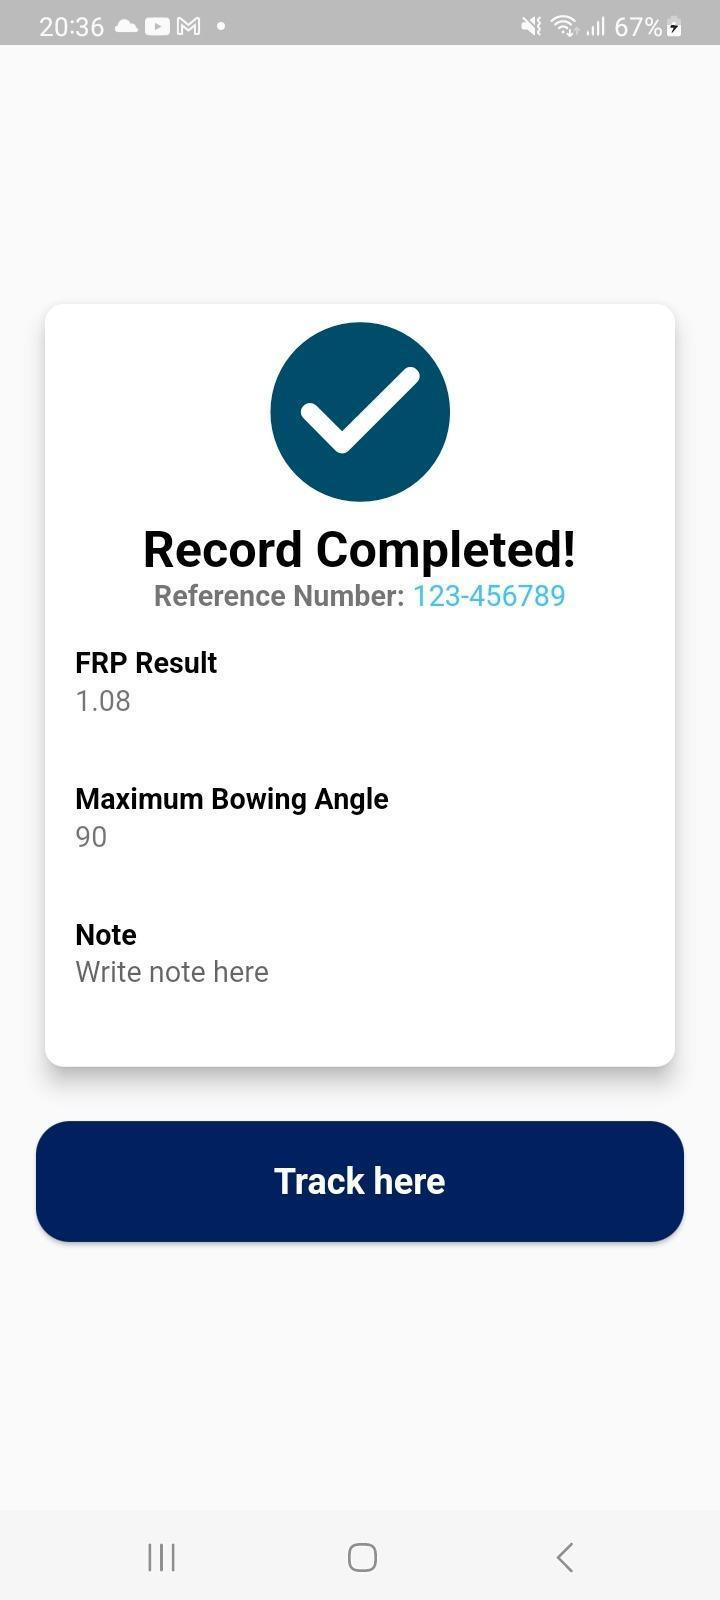
- If the measurement taken are correct, the apps will automatically prompt a “Record Completed” message box and show the measurement summary. “track here” option will lead to Progress page.
- If there are measurement error, the process stops automatically after 30 seconds and the apps will ask to retry the measurement or to cancel.
- The progress of the user can be tracked to observe improvement in the Progress page.